Configure Tokens

This property box allows you to create and modify tokens with the Assign Token Values activity.

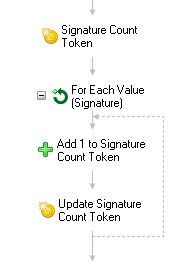
Example: For an upcoming meeting you want to know how many people added their signature to a multi-value Approver field on the agenda. You use the Assign Token Values activity to create a custom token, Signature Count, with a value of zero. You then add a For Each Value activity that goes over each signature in the Approver field. Inside the For Each Value activity, you place a Token Calculator activity configured to add 1 to the Signature Count token for each value found in the Approver field. Also inside the For Each Value activity is an Assign Token Values activity that updates the Signature Count token with the value of the Token Calculator token. The resulting Signature Count token tells you how many people signed the agenda. ClosedSee what this example looks like.

ClosedSee an animated example

This workflow retrieves the sales amounts from a set of invoices and tallies the total for all the invoices.

To configure Tokens

  1. Add the Assign Token Values activity to your workflow definition by dragging it from the Toolbox Pane and dropping it in the Designer Pane.
  2. Select the activity in the Designer Pane.
  3. Under ClosedTokens in the Properties Pane, click Create to create a new token, or click Modify to update an existing token.
  4. To Create a New Token

    1. Click Create in the Tokens property box.
    2. Type in a name for the new token in the top text box.
    3. Optional: Select the checkbox next to Allow token to have multiple values to create a multi-value token.
    4. Type in a token value, or click the token button (right arrow) to use tokens.
    5. Optional: Click the plus button to expand the Token Tags section, and check the categories relevant to your new token. More information.
    6. Click OK.

    To Modify an Existing Token

    1. Click Modify in the Tokens property box.
    2. Select an activity that produced a token from the Activity drop-down menu. Alternatively, click the Browse button (ellipsis) to browse for an activity in the Select Activity dialog box.
    3. Select a token from the Token drop-down menu.
    4. Type in a new value for the token, or click the token button (right arrow) to use tokens.
    5. Click OK.
    6. Tip: You can easily modify a token created by an Assign Token Value activity within the same workflow. Copy the Assign Token Value activity and paste it at the point you want to modify the created token. Right-click the token you want to modify in the Tokens property box for the pasted activity, and select Change action to 'Modify'. The pasted activity now modifies the original token instead of creating a new token that is a duplicate of the one created by the original activity.

  5. Optional: You can add to and organize your custom tokens in the Tokens property box in the Properties Pane.

This documentation is specific to version 9.0. You can find the most up-to-date help files for the latest version at Current Online Laserfiche Product Help Files.

For further help or feedback, please see the Laserfiche Support Site.


© 2013 Laserfiche